
At Pixop, we're obsessed with video enhancement and machine learning — our modest ambition is to produce the most appealing digital imagery possible. Prompted by our own curiosity and questions we got while attending the recent IBC2019 show in Amsterdam, we set out to investigate how our current workhorse, Pixop Super Resolution, fares against other upsampling algorithms, i.e., both classic interpolation methods and commercial software offerings. Well, as you are about to see, our upsampler turned out to be the most accurate in every test.
Photo credit: Zain Saleem
The Challenge
As no relevant published benchmarks were found, we decided to conduct our own testing. Specifically, we measure an algorithm’s ability to reconstruct video in terms of how appealing it is to a human observer via Netflix’s VMAF metric. The ability to hallucinate pixels of the original video accurately is thus determined, i.e., how well challenging features such as edges, textures and curves are preserved and reconstructed. The advantages of this approach are straight-forward objective quantification of performance and reproducibility as opposed to performing visual subjective testing on humans.
Meet the Contestants
We had to limit the scope of our testing and be smart in terms of selecting video footage and competing algorithms. Initially we performed some research and identified the group of candidates to pit against our algorithm. For instance, we have heard the term “industry standard in the broadcast industry” used for both Grass Valley’s Alchemist Ph.C. and Adobe After Effect’s Detail-Preserving Upscale. Both of these were obviously included.
Due to the proprietary nature of many of the algorithms involved, it’s impossible to make any predictions about their complexity and sophistication. Each algorithm obviously has its own strengths and weaknesses in areas such as visual quality, speed, ease of use, and flexibility from a UI standpoint. It’s outside the scope of this post to dive deeply into the technical details of each.
Where applicable screenshots of the settings used are included below. Some products offer more flexibility than others. Significant consideration and experimentation was put into aligning the settings as much as possible.
Pixop — Pixop Platform (SaaS)
Pixop Super Resolution (internally known as “PABSR1” and a part of Pixop available on www.pixop.com) is our machine learning based algorithm trained on tens of millions of low-res/high-res pairs of image patches. It is able to perform accurate upscaling up to x4 and produces a predictable, robust output which is a distinct advantage over e.g. Deep Learning blackbox methods.
It is important to stress that apart from assigning it an orange label (instead of blue) in the diagrams below, our own algorithm got no other special privileges during testing.
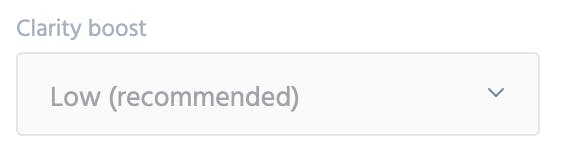
Pixop Super Resolution “Clarity boost” setting (i.e. the default “Low”) used for all videos

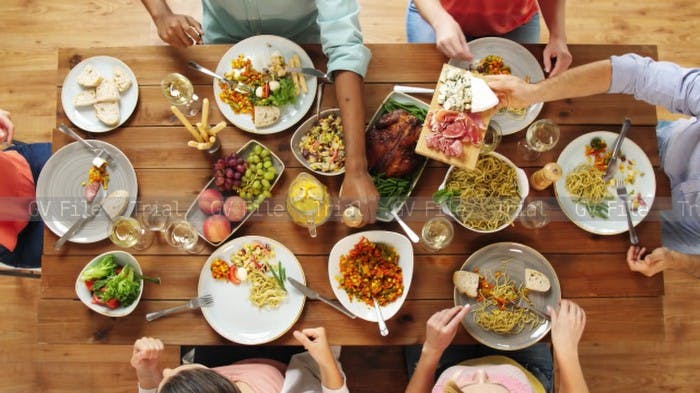
Example: Single frame of Pixop Super Resolution x3 upscaling extracted from the “Dinner Table” video at 00:00:03
FFmpeg — libswscale (5.3.100)
Four classic linear filtering algorithms are included listed in ascending order of complexity and speed:
- Nearest-neighbor interpolation (point sampling)
- Bilinear interpolation
- Bicubic interpolation
- Lanczos interpolation
None of these algorithms require configuration and have been implemented in many different products over the years. We think highly of the open source video processing tool FFmpeg and for that reason we tested the implementations in “libswscale” that come with FFmpeg 4.2.1.

Example: Single frame ofLanczos interpolationx3 upscaling extracted from the “Dinner Table” video at 00:00:03
Grass Valley — Alchemist XF (free trial, 4.0.1.2)
The commercial video file processing tool developed by Grass Valley (formerly Snell). Alchemist is primarily a format and frame-rate conversion tool that also does rescaling by mean of the motion compensation algorithm called “Alchemist Ph.C.” (Ph.C. is short for “Phase Correlation”) which has been around since 1992.
As a side note, Grass Valley also offers Quasar XF which is essentially the same product that only does format conversion and rescaling; no frame-rate conversion.

Alchemist profile for 29.97 fps videos — for 30 fps video the “[Default] 1080 30p ProRes” profile was used instead
Example: Single frame of Alchemist Ph.C. x3 upscaling extracted from the “Dinner Table” video at 00:00:03
Blackmagic Design — DaVinci Resolve 16 (free trial, 16.0.0.060)
DaVinci Resolve (Studio) is a native video editor developed by Blackmagic Design. Their proprietary “ Super Scale” feature is designed to scale video from SD to HD or even beyond — quoting the new features PDF from DaVinci Resolve 15 they:
… use advanced algorithms to improve the appearance of image detail when enlarging clips by a significant amount, such as when editing SD archival media into a UHD timeline, or when you find it necessary to enlarge a clip past its native resolution in order to create a closeup.

2x upscaling settings used for DaVinci Resolve — for 3x upscaling Super Scale was set to “3x”, the other two parameters were the same
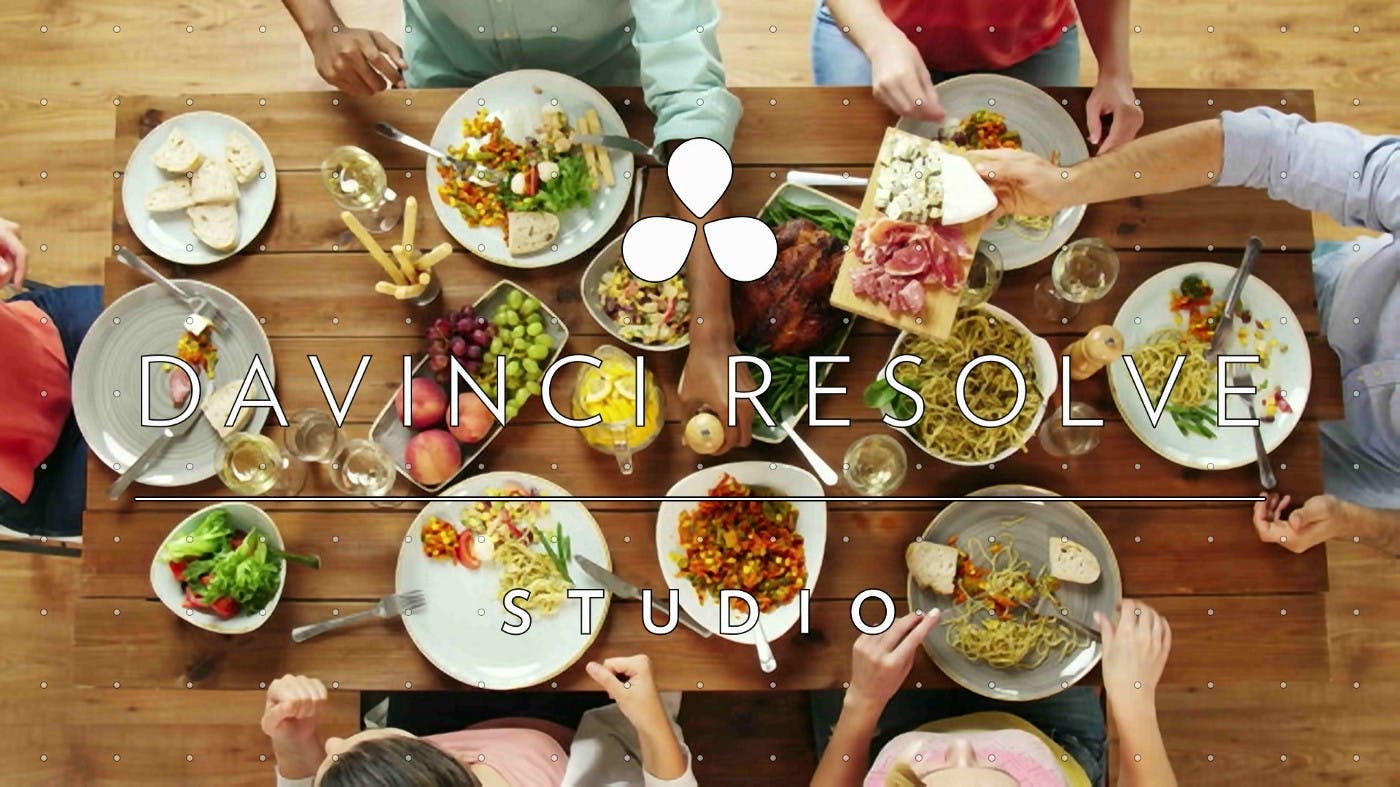
Example: Single frame of DaVinci Resolve Super Scale x3 upscaling extracted from the “Dinner Table” video at 00:00:03
Adobe — After Effects (16.1.13)
Adobe’s After Effects is another commercial video editor. In its more recent incarnations it offers a “Detail-preserving Upscale” which Adobe describes as follows:
The Detail-preserving Upscale effect is capable of scaling up images by large amounts while preserving details in the image. The sharpness of sharp lines and curves is preserved. For example, you can scale up from SD frame sizes to HD frame sizes, or from HD frame sizes to digital cinema frame sizes.
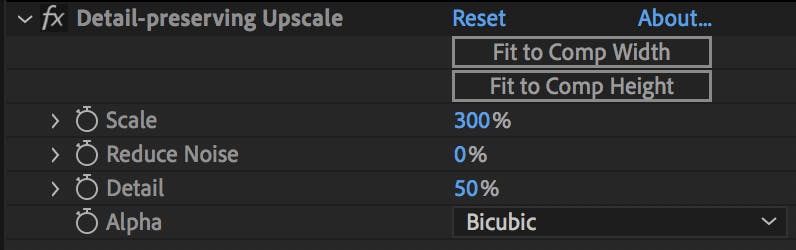
3x upscaling settings used in Adobe After Effects — for 2x upscaling Scale was set to “200%”, all other parameters were the same
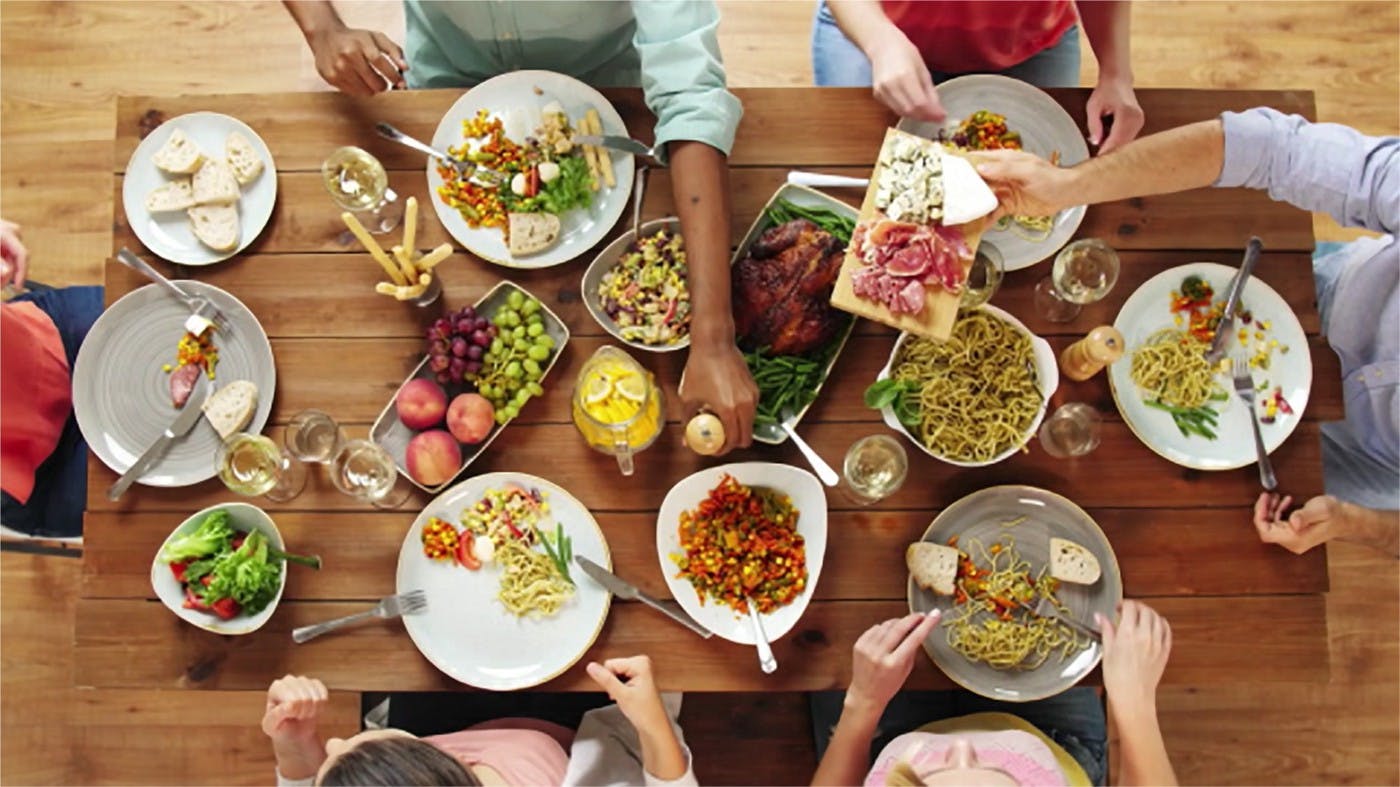
Example: Single frame of Adobe After Effect’s Detail-preserving Upscale x3 upscaling extracted from the “Dinner Table” video at 00:00:03
Boris FX — Continuum (free trial, 12.5.2)
The last contestant is Boris FX’s “BCC UpRez” included in their Continuum plugin toolkit. The plugin’s purpose is described as:
BCC Uprez is used to increase the resolution of source clips (for example SD to HD or SD/HD to UHD) while ensuring maximum possible image quality. Uprez uses advanced techniques to maintain and fine tune image details, generating much higher quality final images than can be obtained with standard host upscaling.
Boris FX plugins are available for many different video editors and platforms. We only tested the FCP plugin for Final Cut Pro X 10.4.6.
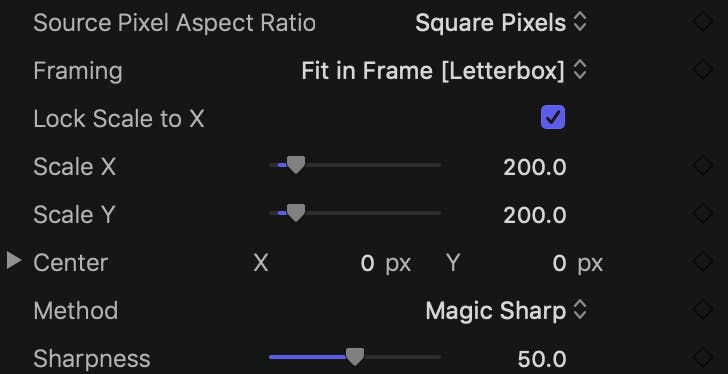
2x upscaling settings used for BCC UpRez in Final Cut Pro X 10.4.6 — for 3x upscaling Scale X and Scale Y was set to “300.0”, all other parameters were the same
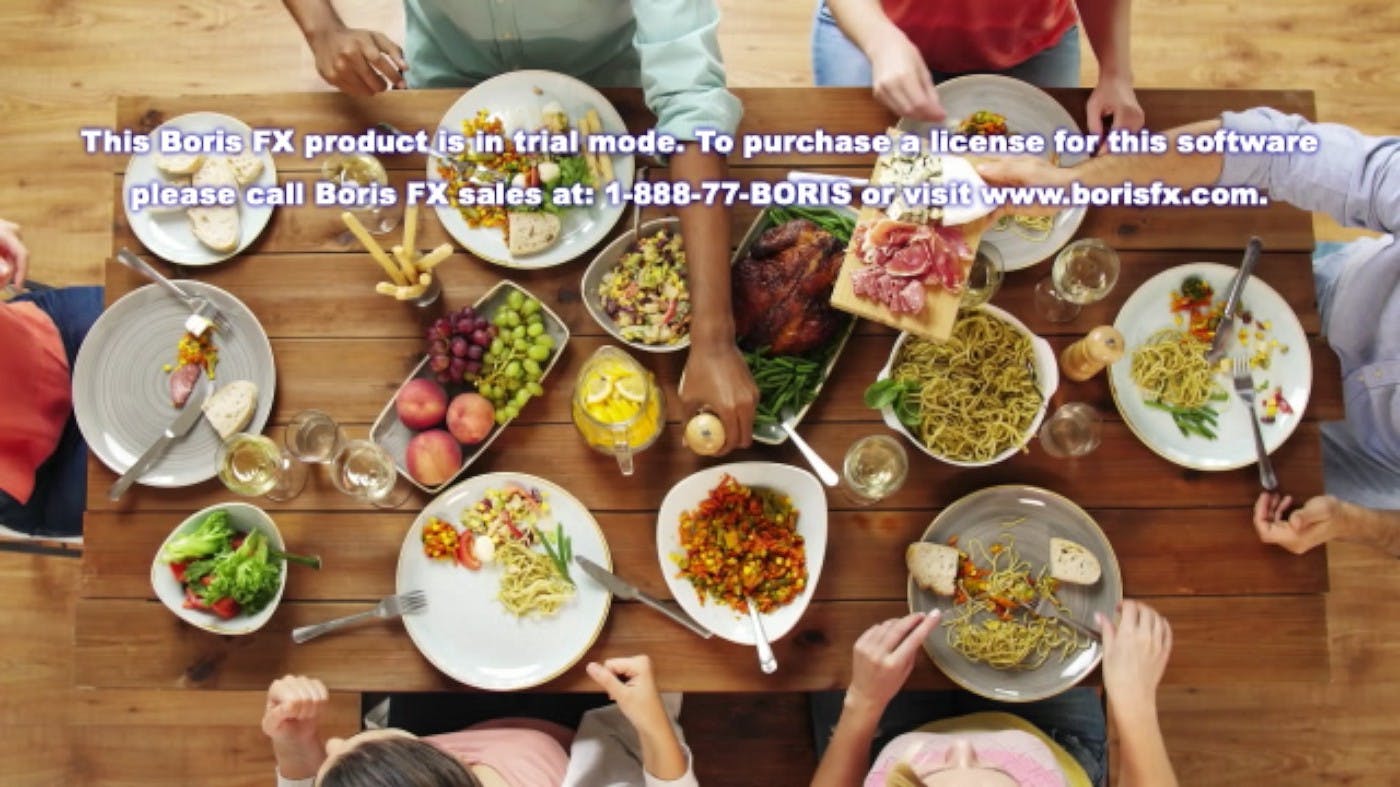
Example: Single frame of BCC UpRez x3 upscaling extracted from the “Dinner Table” video at 00:00:03
Test Methodology
All upscalers were tested on three downsampled Shutterstock 1080p HD videos via FFmpeg using the VMAF metric. We strived for a variety of different video types: purely synthetic CG, premium fixed camera position and handheld camera. Using decent quality footage is important to assess simpler algorithms from more sophisticated ones.
Details about why we chose VMAF and how we performed the test are provided in this section.
VMAF — the quality metric of choice
We decided to use VMAF as the metric for comparing algorithms. VMAF is short for Video Multi-method Assessment Fusion which is a modern video quality metric developed by Netflix that combines human vision modeling with machine learning. It is intended to replace classic scientific metrics like PSNR and SSIM which do not accurately capturing human perception.
Quoting the authors themselves from their Medium announcement post, VMAF scores are interpreted as:
VMAF scores range from 0 to 100, with 0 indicating the lowest quality, and 100 the highest. A good way to think about a VMAF score is to linearly map it to the human opinion scale under which condition the training scores are obtained. As an example, the default model v0.6.1 is trained using scores collected by the Absolute Category Rating (ACR) methodology using a 1080p display with viewing distance of 3H. Viewers voted the video quality on the scale of “bad”, “poor”, “fair”, “good” and “excellent”, and roughly speaking, “bad” is mapped to the VMAF scale 20 and “excellent” to 100. Thus, a VMAF score of 70 can be interpreted as a vote between “good” and “fair” by an average viewer under the 1080p and 3H condition.
A note to the reader here: a viewing distance of 3H means “3 times the height of the display”.
Source Videos
All original HD videos were bought/licensed from Shuttershock in H.264 / AVC encoded form (progressive, YUV 4:2:0 pixel format).
The downsampled sources videos were created using FFmpeg by doing area sampling of the HD version. For example, the command used to produce a version half the size of the original is:
ffmpeg -i [original_mov] -vf "scale=iw/2:ih/2" -sws_flags area
-c:v prores [half_size_mov]
A note to myself here. In future tests it is better to encode the downsampled source videos with Apple ProRes 422 HQ instead of using the standard 422 profile. It allows the sophisticated algorithms to separate themselves to a higher degree as more details are retained.
Source resolutions were then 960x540 (for /2 decimation) and 640x360 (for /3 decimation), respectively.
Reconstructed Videos
After having looked into the common set of capabilities for all tested products, it was decided to encode the reconstructed 1080p HD videos using the Apple ProRes 422 HQ codec wrapped in a QuickTime container. It allows for a pretty accurate comparison due to the low compression implied by the codec+profile combo.

Mask used to remove watermarks/nag screens — it effectively hides 16.8% of all pixels when computing the VMAF scores
Covering Watermarks
We had to resort to free trial software in order to test three of the proprietary products. Each of those adds a watermark to the output. We had to produce a composite mask which covers all watermarks. The result was then applied as an overlay on each frame to both the reference video and all reconstructed videos to level the playing field between all contestants.
Note that this actually helps out the poorly performing upscalers more than the best ones (boosting their scores as much as 5 VMAF points in some tests!) since fewer pixels are effectively compared. However, this is not a major problem since we are not overly concerned with the absolute VMAF scores, only how algorithms rank relative to each other.
How VMAF scores are computed
A fairly straight-forward way of computing the VMAF is using a FFmpeg video filter. Commercially available tools like MSU Quality Measurement Tool computes VMAF, as well, but it only runs natively under Windows and on Linux via Wine — not optimal for those of us who are Mac users.
The precompiled builds of FFmpeg I have come across do not have VMAF support enabled. We therefore made a local build of FFmpeg 4.2.1 with support for libvmaf.a (version 0.6.1, VDK version 1.3.15) as described in VMAF's GitHub repo using master branch code.
For computing the VMAF score of a reconstructed video we then did:
ffmpeg -nostats -i reference.mov -i [reconstructed_mov] -i mask.png -lavfi
"[2:v]split[overl1][overl2];[0:v][overl1]overlay[v1];[1:v][overl2]overlay[v2];
[v1][v2]libvmaf" -f null -
When this command is executed, FFmpeg computes the VMAF score and sends the score to the console on the last line of its output:
[libvmaf @ 0x7f806c4505c0] VMAF score: 92.419584
Et voilà! For this example the score would then be recorded as “92.419584”.
Test Protocol
For actual every video tested we record:
- Various metadata of the source video
- Our own notes about the footage
- VMAF scores (0–100) for 2x and 3x reconstruction
- 66x66 cutouts of the original HD video vs every contestant’s reconstruction (2x and 3x) -including the downsampled source area
- A quick verdict about which algorithm performed the best
Test 1: Dinner Table
Transcoded version of the original “Dinner Time” video in 1080p HD.
Metadata
- Shutterstock stock footage id: 32420230
- Description: “Eating and leisure concept — group of people having dinner at table with food”
- File size: 149 MiB
- Duration: 18 seconds
- Video bitrate: 69.5 Mbps
- Frame rate: 30 FPS
- Container: QuickTime
Notes
The camera is at a fixed position. Lots of high quality edges, textures and details to work on here-advanced upsampling algorithms are supposed to do a good job of upscaling those.
2x reconstruction
Download the x2 reconstructed “Dinner Table” videos here (4.2 GiB).
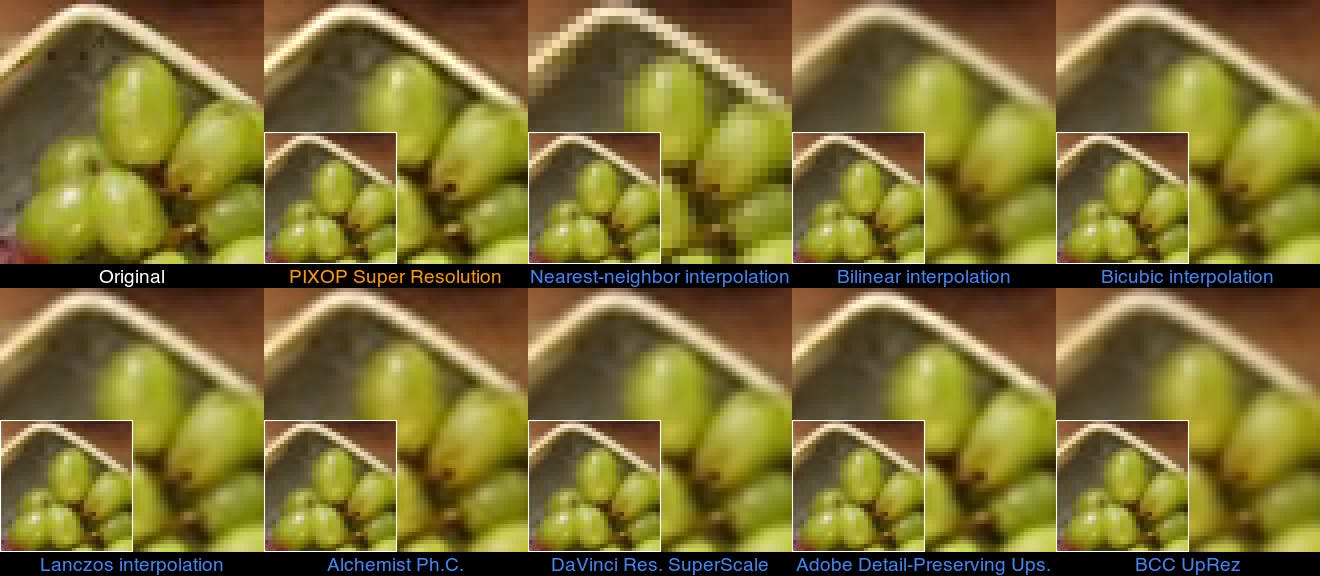
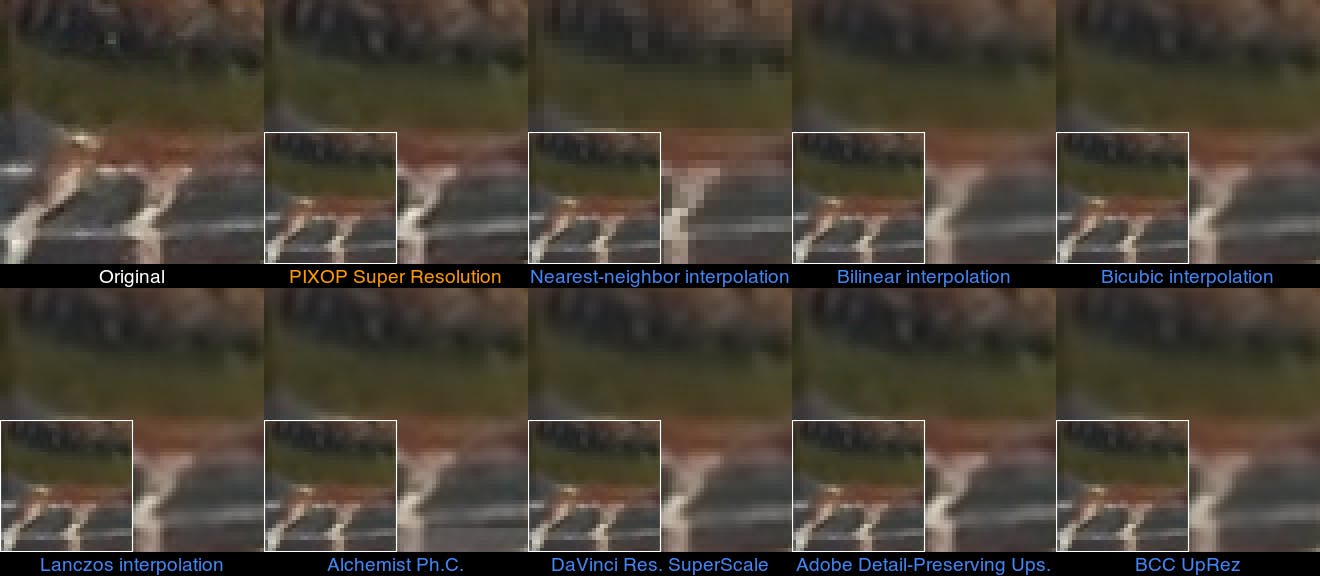
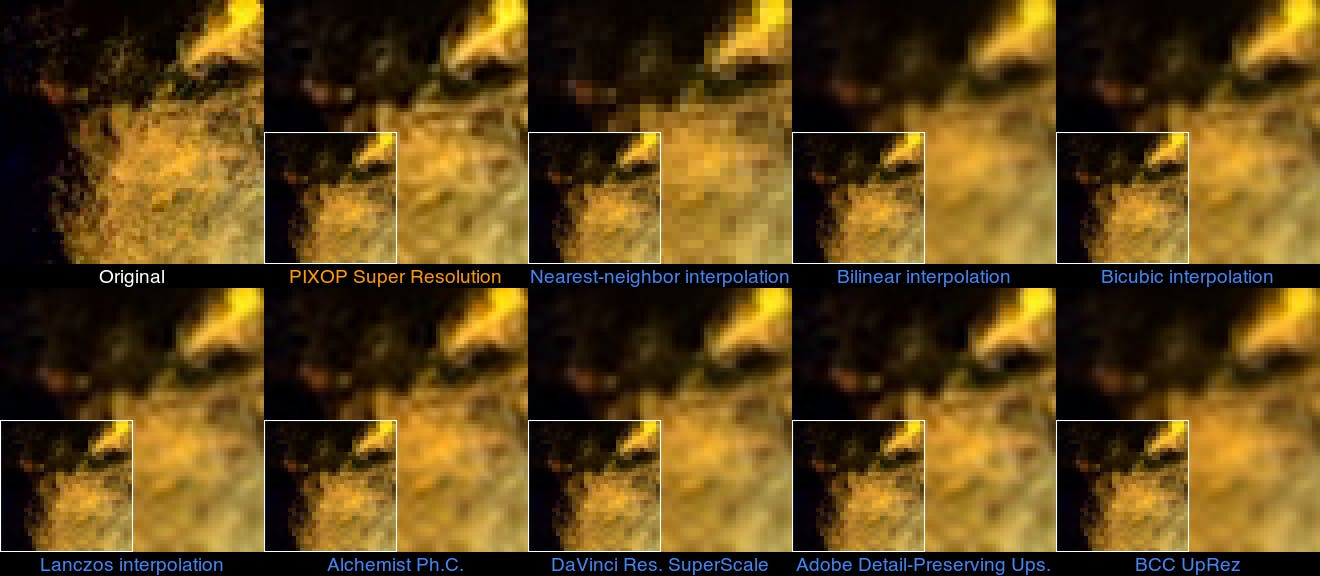
66x66 cutouts at pixel position x=672, y=384 of the original HD video vs every contestant’s 2x reconstruction — grabbed from the “Dinner Table” video at 00:00:03 — the downsampled 33x33 source area is overlaid on each reconstruction
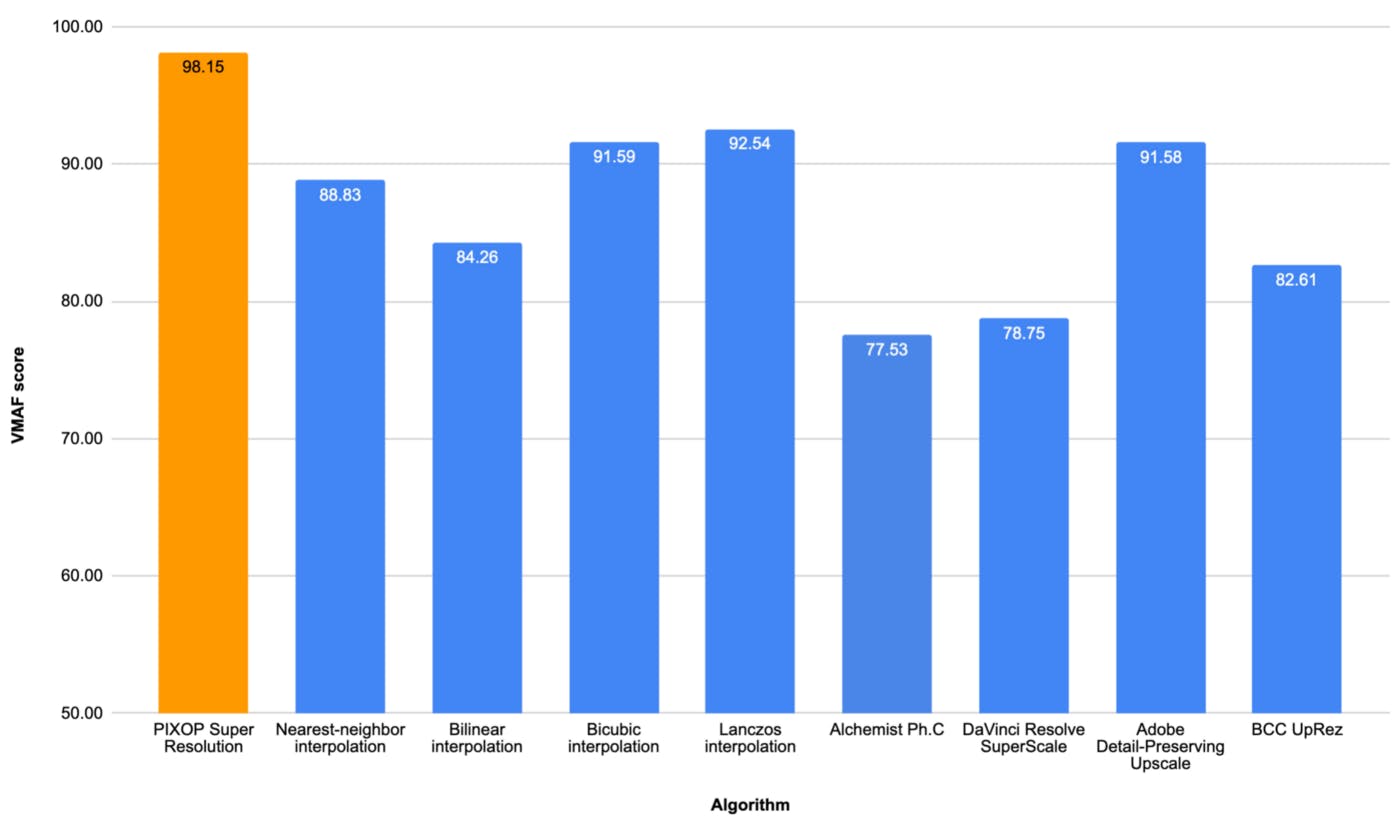
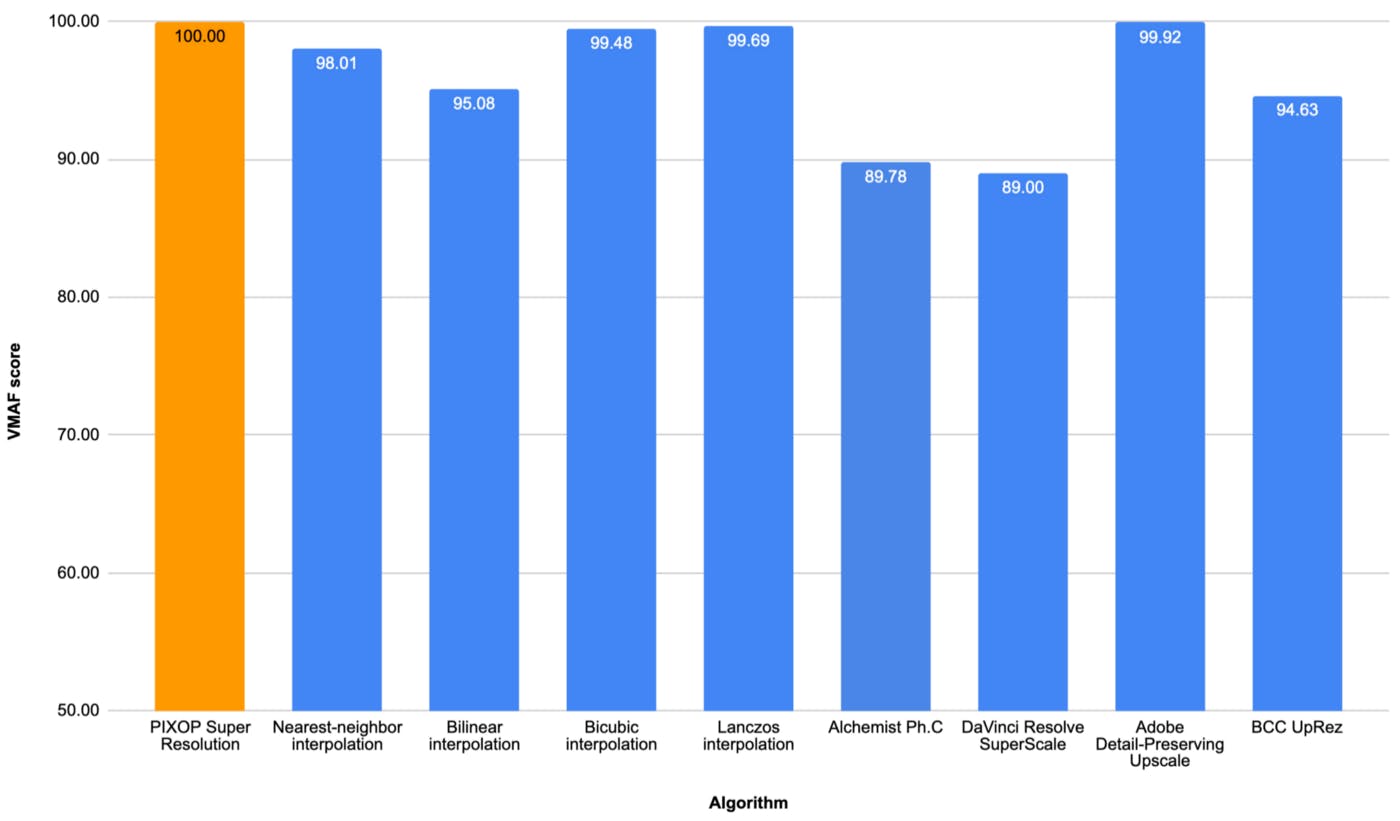
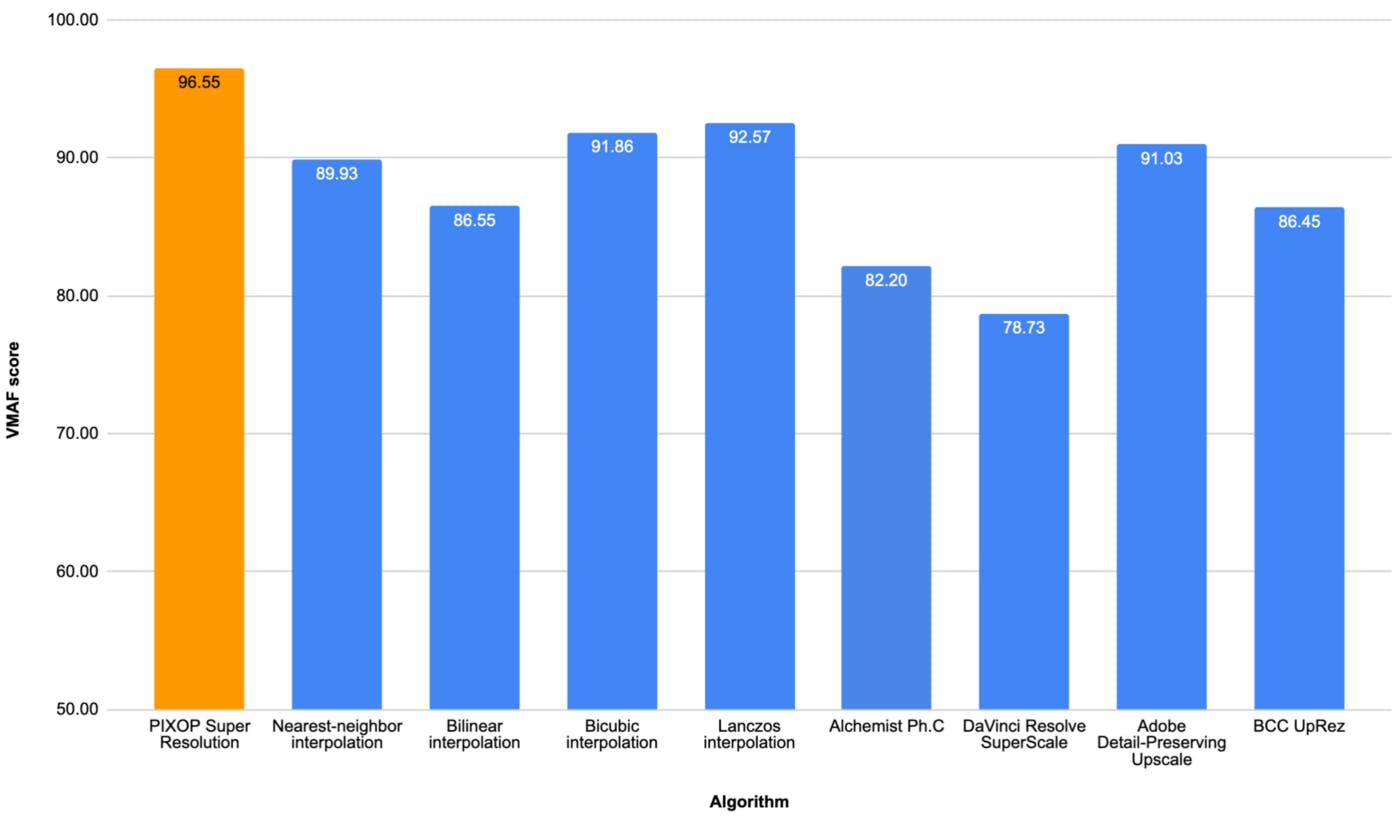
VMAF scores of reconstructing 2x downsampled “Dinner Table” 1080p HD Shutterstock video (157 MiB) for every tested algorithm
Verdict: Pixop Super Resolution wins the round while Bicubic interpolation, Lanczos interpolation and Adobe Detail-Preserving Upscale come in second.
3x reconstruction
Download the x3 reconstructed “Dinner Table” videos here (4.2 GiB).
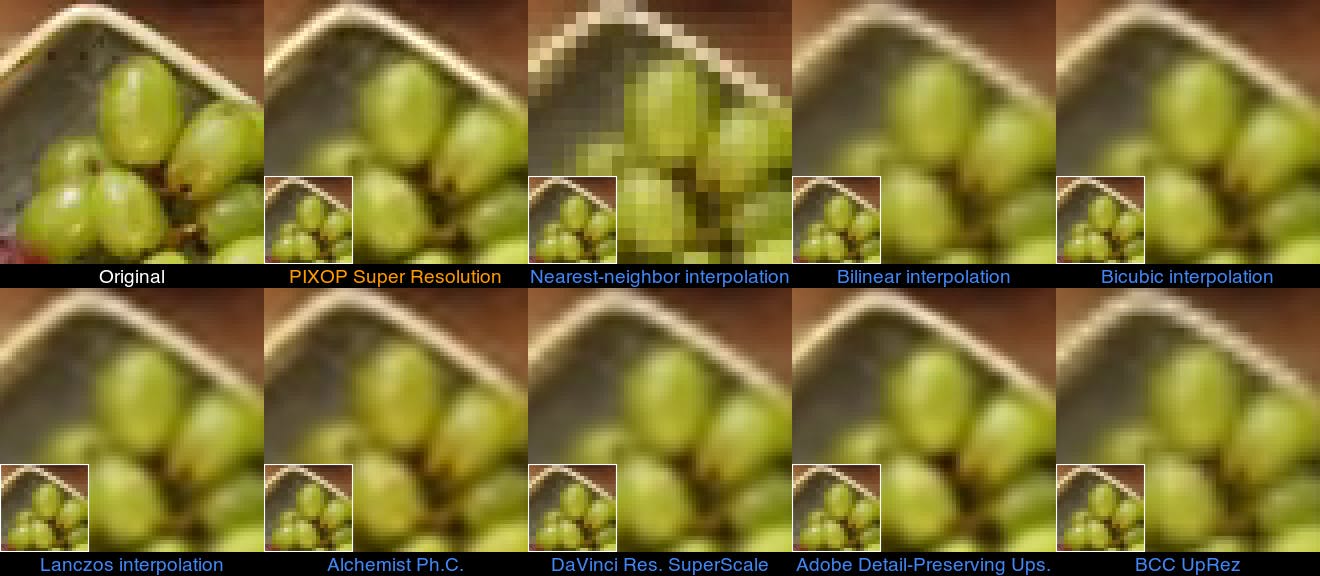
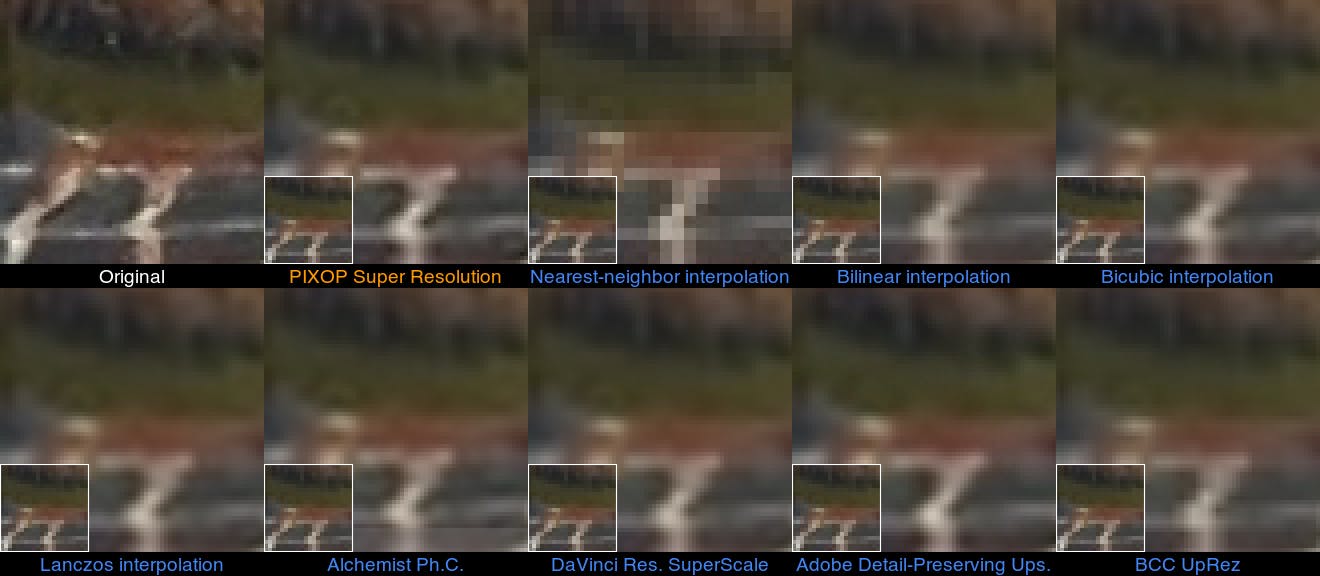
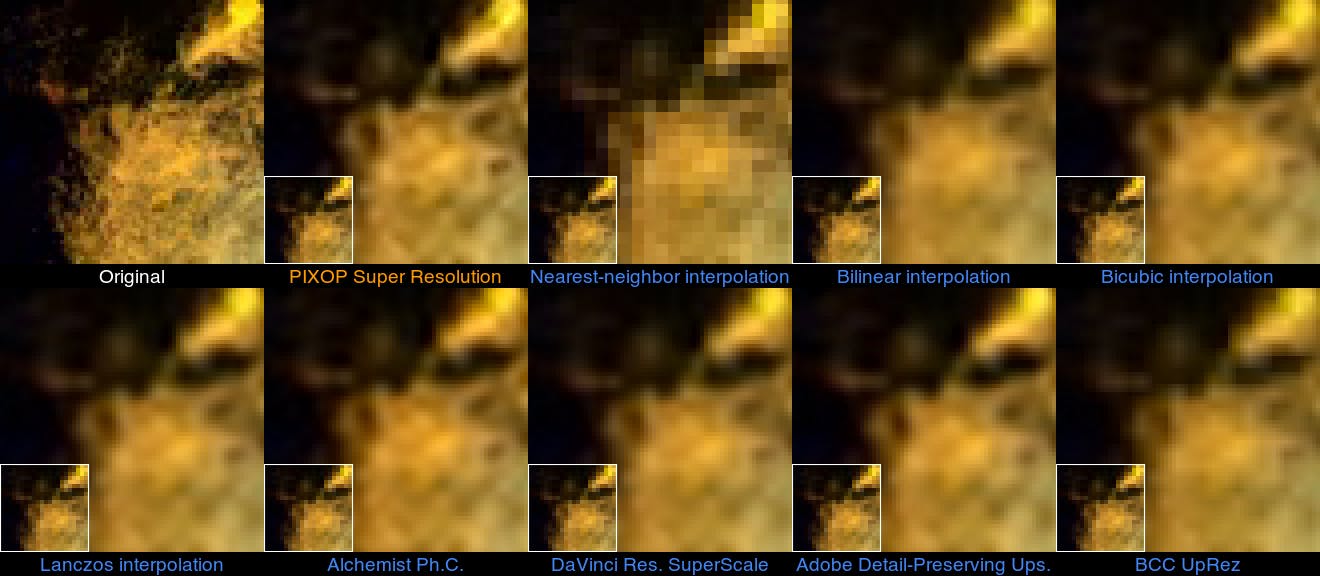
66x66 cutouts at pixel position x=672, y=384 of the original HD video vs every contestant’s 3x reconstruction — grabbed from the “Dinner Table” video at 00:00:03 — the downsampled 22x22 source area is overlaid on each reconstruction
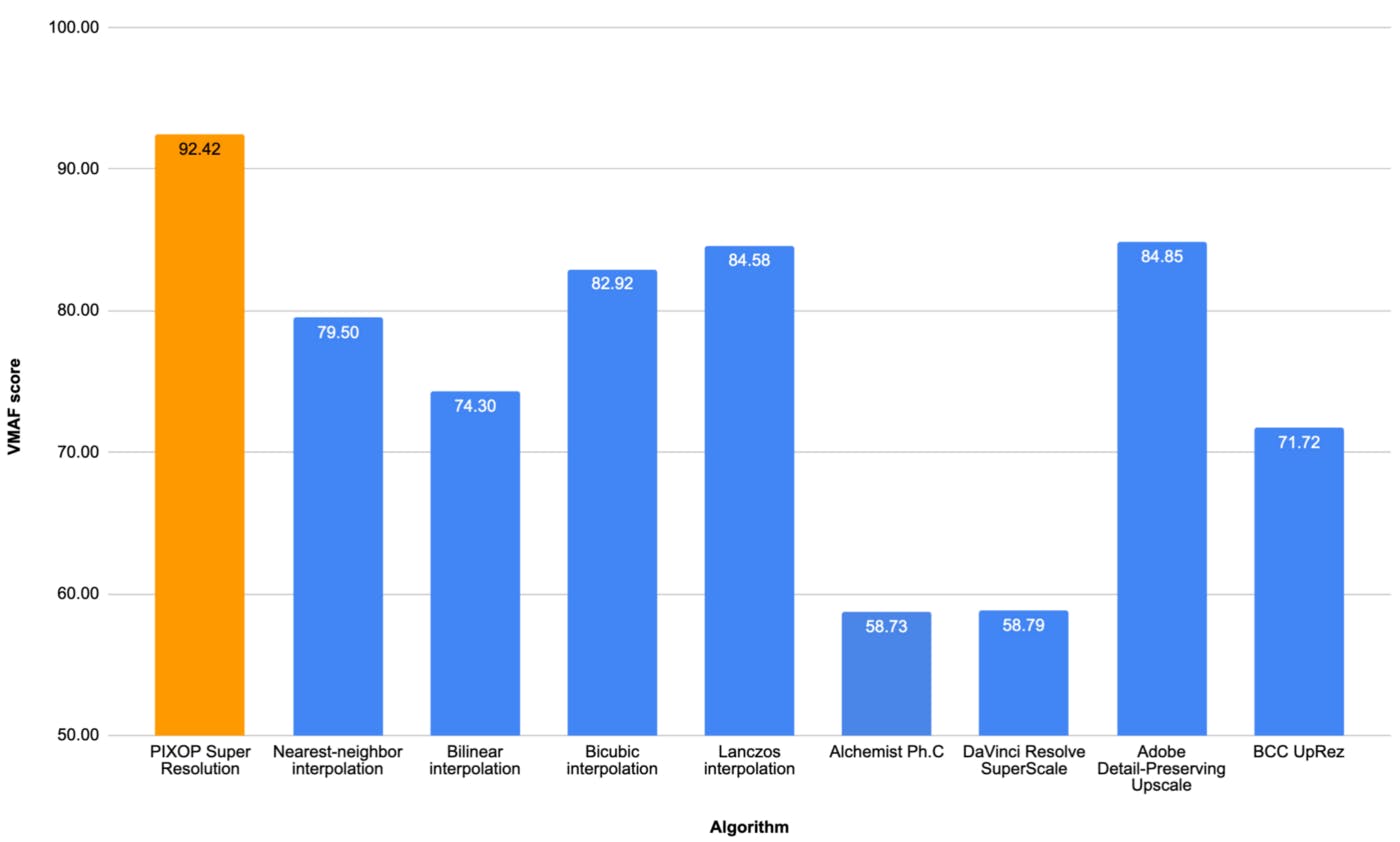
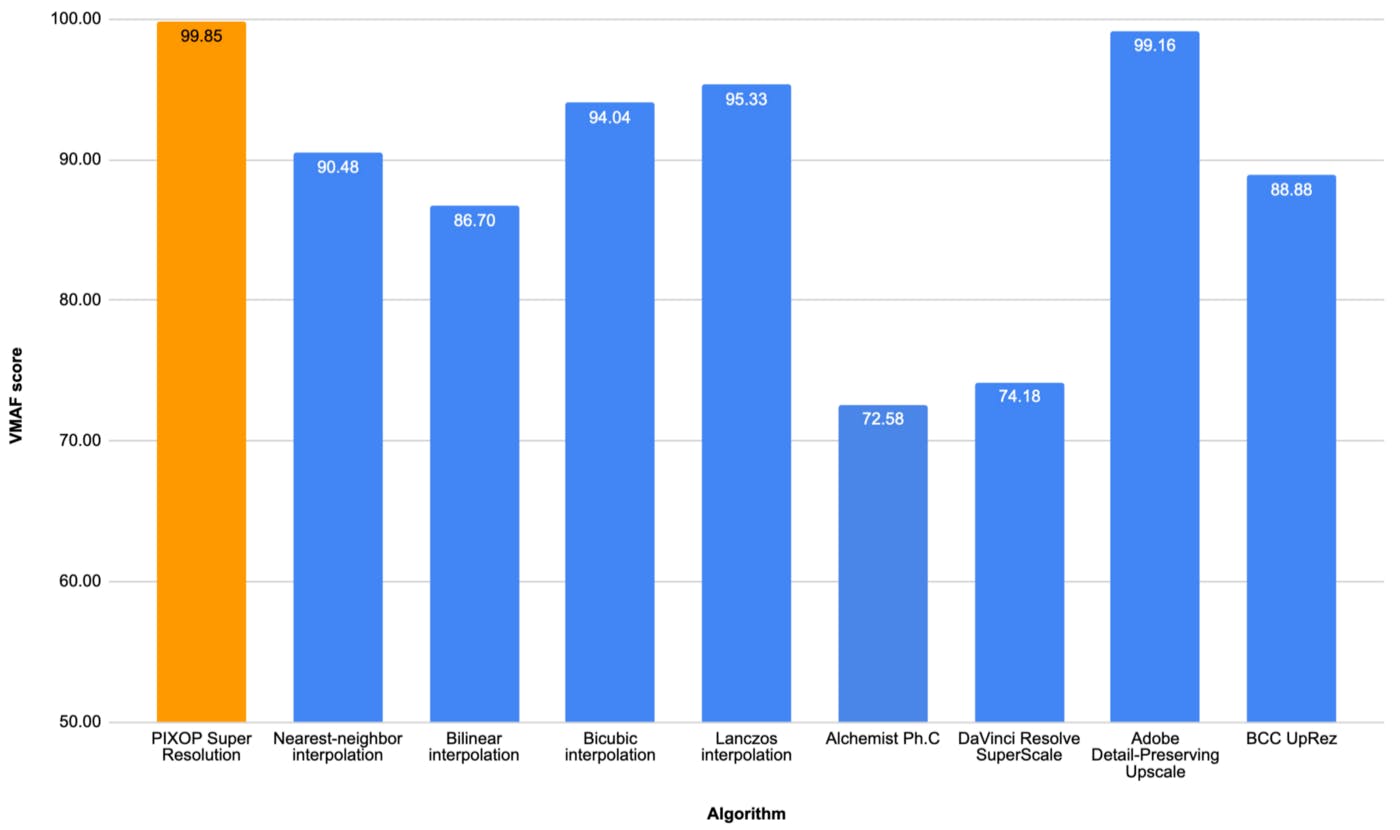
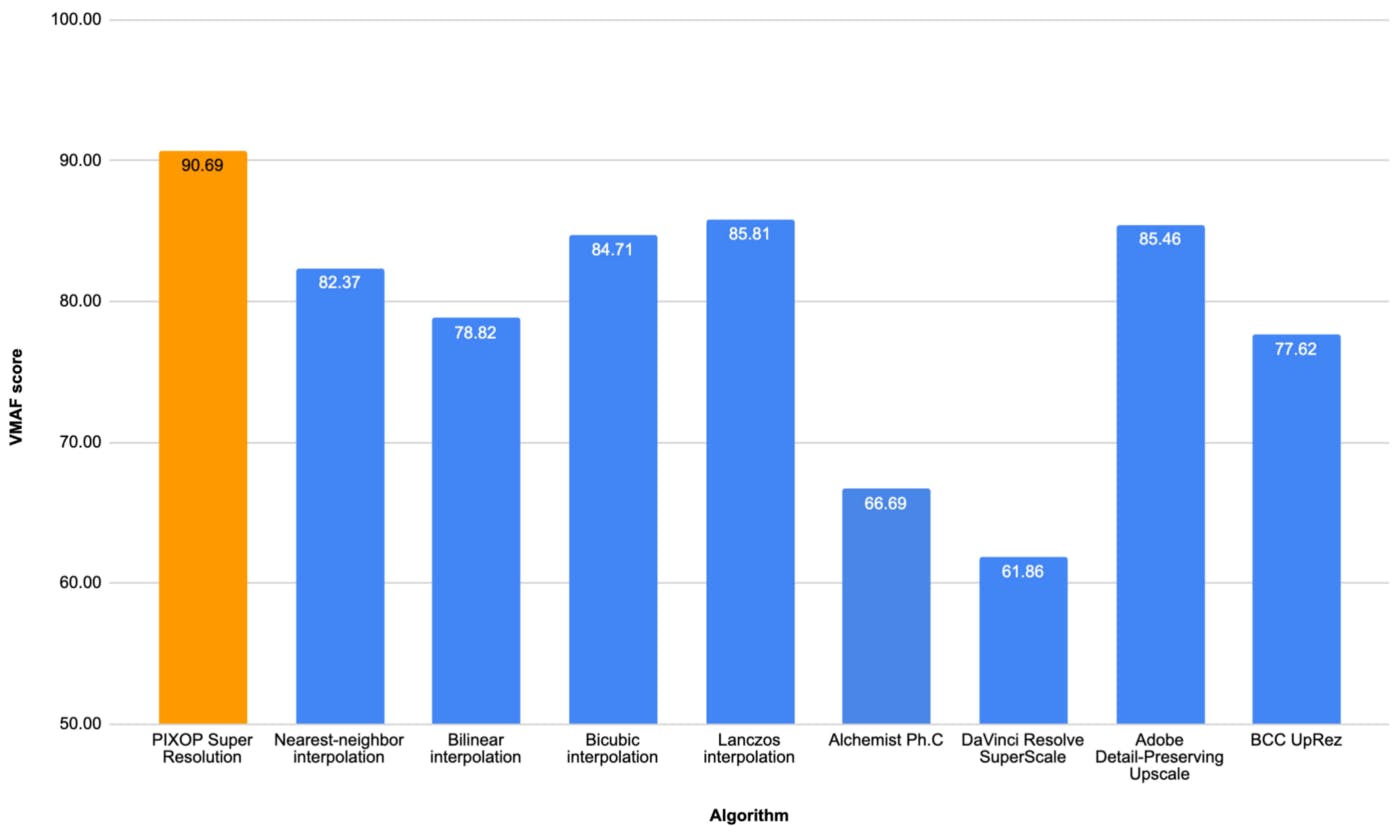
VMAF scores of reconstructing 3x downsampled “Dinner Table” 1080p HD Shutterstock video (78 MiB) for every tested algorithm
Verdict: Pixop Super Resolution wins the round. Lanczos interpolationand Adobe Detail-Preserving Upscale come in second.
Test 2: Turtle
Transcoded version of the original “Turtle” video in 1080p HD:
Transcoded version of the original “Turtle” video in 1080p HD.
Metadata
- Shutterstock stock footage id: 13945376
- Description: “Hawksbill Sea Turtle is swimming and chases the camera probably seeing it’s mirror image”
- File size: 101 MiB
- Duration: 25.5 seconds
- Video bitrate: 33.3 Mbps
- Frame rate: 29.97 FPS
- Container: MPEG-4
Notes
The footage is shot slightly out of focus and under water obviously. It is significantly blurrier than the other two clips and stored with a lower bitrate than the other two videos tested. A slow camera shutter speed was quite possibly used to acquire this footage which adds some motion blurring, as well.
For lower upscaling factors we can actually expect all algorithms to perform pretty well.
2x reconstruction
The x2 reconstructed “Turtle” videos can be downloaded here (5.4 GiB).
66x66 cutouts at pixel position x=696, y=480 of the original HD video vs every contestant’s 2x reconstruction — grabbed from the “Turtle” video at 00:00:24 — the downsampled 33x33 source area is overlaid on each reconstruction
VMAF scores of reconstructing 2x downsampled “Turtle” 1080p HD Shutterstock video (151 MiB) for every tested algorithm
Verdict: Most scalers actually do a good job here due to the nature of the source footage. PIXOP Super Resolution, Bicubic interpolation, Lanczos interpolation and Adobe Detail-Preserving Upscale are all very close to the perfect score.
3x reconstruction
The x3 reconstructed “Turtle” videos can be downloaded here (5.4 GiB).
66x66 cutouts at pixel position x=696, y=480 of the original HD video vs every contestant’s 3x reconstruction — grabbed from the “Turtle” video at 00:00:24 — the downsampled 22x22 source area is overlaid on each reconstruction.
VMAF scores of reconstructing 3x downsampled “Turtle” 1080p HD Shutterstock video (78 MiB) for every tested algorithm
Verdict: It’s basically a tie between Pixop Super Resolution and Adobe Detail-Preserving Upscale.
Test 3: Color Explosion
Transcoded version of the original “Color Explosion” video in 1080p HD
Metadata
- Shutterstock stock footage id: 24419024
- Description: “Cg animation of color powder explosion on black background. Slow motion movement with acceleration in the beginning.”
- File size: 241 MiB
- Duration: 20 seconds
- Video bitrate: 101.1 Mbps
- Frame rate: 30 FPS
- Container: QuickTime
Notes
This is a premium quality synthetic computer graphics clip containing plenty of high frequency details that are extremely challenging (if not impossible) to accurately reconstruct.
2x reconstruction
Download the x2 reconstructed “Color Explosion” videos here (4.2 GiB).
66x66 cutouts at pixel position x=912, y=620 of the original HD video vs every contestant’s 2x reconstruction — grabbed from the “Explosion” video at 00:00:03 — the downsampled 33x33 source area is overlaid on each reconstruction
VMAF scores of reconstructing 2x downsampled “Color Explosion” 1080p HD Shutterstock video (150 MiB) for every tested algorithm
Verdict: Pixop Super Resolution is the top performer. Lanczos interpolation come in second.
3x reconstruction
Download the x3 reconstructed “Color Explosion” videos here (4.1 GiB).
66x66 cutouts at pixel position x=912, y=620 of the original HD video vs every contestant’s 3x reconstruction — grabbed from the “Explosion” video at 00:00:03 — the downsampled 22x22 source area is overlaid on each reconstruction
VMAF scores of reconstructing 3x downsampled “Color Explosion” 1080p HD Shutterstock video (68 MiB) for every tested algorithm
Verdict: Pixop Super Resolution is the top performer. Bicubic interpolation, Lanczos interpolation and Adobe Detail-Preserving Upscale come in second.
Noteworthy Observations
We were admittedly surprised by the poor performance of some of the commercial offerings. It is important to stress that we did not intend to make competing algorithms “look bad” in any way. As a matter of fact, we spent considerable time experimenting with each product to get the best VMAF score possible. One explanation which we cannot rule out is that these software products are so complex that it is not unthinkable we didn’t configure them optimally. Let us know if you spot any blatant mistakes or inaccuracies on our part.
It is also interesting to observe that naive pixelating Nearest-neighbor interpolation consistently produces higher VMAF scores than overly smoothing Bilinear interpolation. Our recommendation is to go with at least Bicubic interpolation when interpolation methods are your only option.
Photo credit: Drew Beamer
Independent researchers are encouraged to verify and expand on our findings. In addition to that, we have compiled a non-exhaustive list of ideas for future work:
- Include footage from a diverse set of sources, i.e. produce a larger and much more varied dataset that might include video from sports, cartoons, historical archive footage, etc.
- Perform visual subjective testing using human observers on upscaled footage from HD to e.g. UHD 4K.
- Include fractional upscaling factors (e.g. 2.25) and higher upscaling factors than 3.
- Include more algorithms — specifically more advanced ones based on e.g. Deep Learning.
- Apply other video quality metrics, not only VMAF.
Summary
The VMAF scores on three Shutterstock videos show that Pixop Super Resolution in every test performed the most accurate reconstruction of all contestants -on the “Dinner Table” and “Color Explosion” videos by somewhat of a margin. However, when the content is somewhat blurry (i.e. the “Turtle” video) simpler algorithms unsurprisingly do almost as good a job of reconstructing the signal as more sophisticated ones.
While currently commercially available technology is limited in terms of upscaling and significantly improving the perceived quality of very degraded footage, there is justified hope that Deep Learning based methods will soon change that. As of today, however, value is clearly already gained by using choosing the right upsampling algorithm on decent quality source footage as our testing showed.